Article Contents
Understanding your Inverter's Interface
Connecting your Inverter: Non-HD Wave
Connecting your Inverter: HD Wave
Relevant Models
- SolarEdge HD-Wave (Version Dependent)
- SolarEdge Hybrid
- Older SolarEdge Inverters
Initial Steps
- First, Try Power Cycling your System: Sometimes just turning your system off and on should be able to fix the issue. Ensure that you follow correct procedure for power cycling your system. If unsuccessful, continue with Wi-Fi reconnection.
- Ensure Correct Wi-Fi Connection: All inverter connections require a 2.4GHz home internet connection. If your current internet plan and router only allow 5.0GHz connection, contact your internet provider to resolve this issue.
- Wi-Fi Strength: Ensure that the connection to your inverter is strong enough to operate. If your connection isn't strong, you may need to consider the use of a Wi-Fi extender. There are two methods of testing your connection:
- Quick Method: Seeing how many bars of internet connection your smartphone or tablet receives when standing next to your inverter.
- Accurate Method: Measuring your connection strength via website or app. We personally recommend using WiFiman by Ubiquiti.
Understanding your Inverter's Interface
Non-HD Wave: On the bottom of your inverter, you will see a button next to your ON/OFF switch. This is the LCD (Liquid Crystal Display) button. This button can vary depending on the inverter.
|
 |
 |
HD Wave: For this model, the LCD buttons will be just under the screen on the front plate. There are four main buttons:
|
Connecting your Inverter: Non-HD Wave
Step 1: Toggle the ON/OFF switch to OFF
|
Step 2: Locating WPS (Wi-Fi Protected Setup) Mode on your Inverter
|
.png?width=500&height=500&name=OK%20(2).png) |
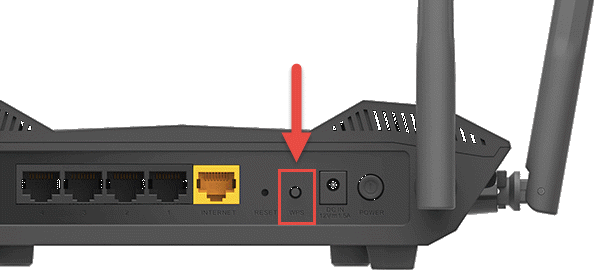
Step 3: Sync from your Internet Router
- Locate your internet modem. Once located, find the WPS button on your router (if you are using an older router that doesn’t have a WPS option, read our article on manually connecting your SolarEdge inverter).
- Push and hold it down until its LED lights up (refer to your router’s manual as light commands can vary between models).
|
Step 4: Confirm Connection on your Inverter
|
.png?width=500&height=500&name=OK%20(3).png) |
Connecting your Inverter: HD Wave
Step 1: Toggle the ON/OFF switch to OFF
Step 2: Entering the Inverter's Settings
- Hold down the OK button for 5 seconds and the system settings will appear.
- You will be prompted with this message: “PLEASE ENTER PASSWORD MESSAGE” (this is asking for the password to enter the inverter menu, not your Wi-Fi password yet).
- Enter the following password: Up, Down, OK, Up, Down, OK, Up, Down.
|
Step 3: Locating the Scan Networks Screen
|
.png?width=500&height=500&name=OK%20(4).png) |
Step 4: Connecting your Inverter to your Home Network
- Locate your home network and select it.
- Enter your router Wi-Fi password.
- Hold down the OK button until it says "Applying".
- Check for the S_OK on the main screen which indicates connection to the SolarEdge server (this might take 3 -5min)
Step 5: Toggle the ON/OFF switch to ON
Next Steps
When reconnecting your inverter back to the internet, your home data may be delayed. In majority of cases, your inverter should communicate back to your home monitoring relatively fast. If this isn't the case, give the system 24 hours to reconfigure and the issue should be fixed.
If this process is unsuccessful, or if any step throughout the process doesn't work (your SolarEdge app might not be able to recognise your Wi-Fi), try manually reconnecting your SolarEdge inverter.
If you encounter any further issues during this process, please refer to the SolarEdge support page or raise a support ticket with SolarHub’s Support and Service Team for further assistance.