---
title: Reconnecting our Sungrow Inverter to Wi-Fi
description: Reconnecting our Sungrow Inverter to Wi-Fi
---
[Skip to content](https://knowledge-base.solarhub.net.au/reconnecting-our-sungrow-inverter-to-wi-fi#main-content)

- [Customer Portal](https://441665238.hs-sites-ap1.com/tickets-view)
Open main navigation
Close main navigation
- [Customer Portal](https://441665238.hs-sites-ap1.com/tickets-view)
How can we help you?
- There are no suggestions because the search field is empty.
1. [SolarHub Knowledge Base](https://knowledge-base.solarhub.net.au/?hsLang=en-au)
2. [Troubleshooting](https://knowledge-base.solarhub.net.au/troubleshooting?hsLang=en-au)
3. [Sungrow](https://knowledge-base.solarhub.net.au/troubleshooting?hsLang=en-au#sungrow)
# Reconnecting our Sungrow Inverter to Wi-Fi
### 
### Article Contents
**[Initial Steps](https://knowledge-base.solarhub.net.au/reconnecting-our-sungrow-inverter-to-wi-fi#initial)**
**[Reconnecting to Wi-Fi](https://knowledge-base.solarhub.net.au/reconnecting-our-sungrow-inverter-to-wi-fi#reconnecting)**
**[Next Steps](https://knowledge-base.solarhub.net.au/reconnecting-our-sungrow-inverter-to-wi-fi#next)**
### Initial Steps
- **Ensure Correct Wi-Fi Connection:** All connections require a 2.4GHz home internet connection. If your current internet plan and router only allow 5.0GHz connection, contact your internet provider to resolve this issue.
- **Wi-Fi Strength:** Ensure that the connection to your system is strong enough to operate. If your connection isn't strong, you may need to consider the use of a Wi-Fi extender. There are two methods of testing your connection:
- **Quick Method:** Seeing how many bars of internet connection your smartphone or tablet receives when standing next to your system.
- **Accurate Method:** Measuring your connection strength via website or app. We personally recommend using [WiFiman by Ubiquiti](https://wifiman.com/).
- **Downloading the iSolarCloud App:** If you haven’t already, download and install the iSolarCloud app on your smartphone or tablet from the [App Store](https://apps.apple.com/au/app/isolarcloud/id1050077439) or [Google Play Store](https://play.google.com/store/apps/details?id=com.isolarcloud.manager&hl=en-US). If you don’t know your login credentials, please [raise a support ticket](https://solarhub.net.au/raise-a-support-ticket/) with SolarHub and we will assist you.
|  |  |
| --- | --- |
| ### **Google Play Store** | ### **Apple App Store** |
### Reconnecting to Wi-Fi
| **Step 1: Access the Configuration Page** - When you first open the iSolarCloud app, click on the Support tab at the bottom of the page. - Under Commissioning Tools, select the WLAN Configuration option. **Step 2: Scan the Inverter's Wi-Fi QR Code** - After WLAN Configuration, it will prompt you to scan a QR code. - The QR code is located on the Wi-Fi dongle located underneath the inverter (as seen below). - Scan and once it detects the QR code, click confirm. | .png?width=300&height=533&name=Untitled%20design%20(1).png) |
| --- | --- |
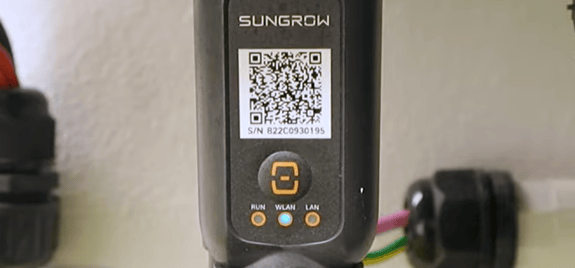
**Step 3: Choosing your Home Network**
- After clicking confirm, it will take you to a screen to select a Wi-Fi option. Select Network.
- From the list of available networks, choose your home network and enter your Wi-Fi password.
**Step 4: Activate EasyConnect**
- The screen will prompt you to activate EasyConnect. To do this, press the button located on the Wi-Fi dongle of your inverter once (under the QR code).
- After pressing the button once, the WLAN light should begin to flash. Return to your smart device and click continue.
- After a brief wait, your inverter should now be connected to your home network. Click complete at the bottom of the page.
### Next Steps
When reconnecting your inverter back to the internet, your home data may be delayed. In majority of cases, your inverter should communicate back to your home monitoring relatively fast. If this isn't the case, give the system 24 hours to reconfigure and the issue should be fixed.
**If this process is unsuccessful, [raise a support ticket](https://solarhub.net.au/raise-a-support-ticket/) with SolarHub’s Support and Service Team for further assistance.**
- [FAQs](https://knowledge-base.solarhub.net.au/faqs?hsLang=en-au#main-content)
- [General FAQs](https://knowledge-base.solarhub.net.au/faqs?hsLang=en-au#general-faqs)
- [Enphase](https://knowledge-base.solarhub.net.au/faqs?hsLang=en-au#enphase)
- [Fronius](https://knowledge-base.solarhub.net.au/faqs?hsLang=en-au#fronius)
- [Sigenergy](https://knowledge-base.solarhub.net.au/faqs?hsLang=en-au#sigenergy)
- [SolarEdge](https://knowledge-base.solarhub.net.au/faqs?hsLang=en-au#solaredge)
- [Tesla](https://knowledge-base.solarhub.net.au/faqs?hsLang=en-au#tesla)
- [Troubleshooting](https://knowledge-base.solarhub.net.au/troubleshooting?hsLang=en-au#main-content)
- [General Troubleshooting](https://knowledge-base.solarhub.net.au/troubleshooting?hsLang=en-au#general-troubleshooting)
- [Enphase](https://knowledge-base.solarhub.net.au/troubleshooting?hsLang=en-au#enphase)
- [Fronius](https://knowledge-base.solarhub.net.au/troubleshooting?hsLang=en-au#fronius)
- [Reposit](https://knowledge-base.solarhub.net.au/troubleshooting?hsLang=en-au#reposit)
- [Sigenergy](https://knowledge-base.solarhub.net.au/troubleshooting?hsLang=en-au#sigenergy)
- [SolarEdge](https://knowledge-base.solarhub.net.au/troubleshooting?hsLang=en-au#solaredge)
- [Tesla](https://knowledge-base.solarhub.net.au/troubleshooting?hsLang=en-au#tesla)
- [Sunpower](https://knowledge-base.solarhub.net.au/troubleshooting?hsLang=en-au#sunpower)
- [Sungrow](https://knowledge-base.solarhub.net.au/troubleshooting?hsLang=en-au#sungrow)
- [Solax](https://knowledge-base.solarhub.net.au/troubleshooting?hsLang=en-au#solax)
- [General](https://knowledge-base.solarhub.net.au/general?hsLang=en-au)
[](http://solarhub.net.au)
[mailto:email@email.com](mailto:email@email.com)
Copyright © 2025, SolarHub